
No products in the cart.


-71%


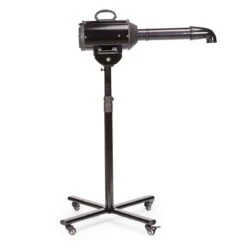


Master Equipment FlashDry Control Stand Dryers
Original price was: $329.99.$96.99Current price is: $96.99.
- Reliable Payments for Reliable Shopping
- 100% environmentally friendly material
- Safe Transactions, Happy Customers
- Where quality meets convenience.

LIMITED TIME OFFER! Free Shipping,
No Minimum with Promo Code DRSHP, +
No Minimum with Promo Code DRSHP, +
LIMITED TIME
OFFER! Free Shipping, No Minimum with Promo Code
DRSHP, +
OFFER! Free Shipping, No Minimum with Promo Code
DRSHP, +
Our versatile Master Equipment™ FlashDry Control
Stand Dryer functions as both a stand dryer and a
force air canister dryer.
Stand Dryer functions as both a stand dryer and a
force air canister dryer.
- Comes with these accessories: Stand, hands-free rigid
arm, flexible hose, and two nozzles - User-friendly buttons surround an LCD screen that
displays everything from the air output setting to the heat
level - The LCD screen also includes an “hours used indicator” to
help users know when to perform maintenance on the unit - Choose heat or no-heat option with just the touch of a
button - Can be used as a canister or stand dryer (stand adjusts
from 29½”–49½”)
Features a tip-resistant, 4-wheeled base for added stability in
use and when moving around the shop.
Specifications:
- Air Volume: 83.56 CFM
- Air Speed: 6181.027 FPM
- Heat: up to 141.8 degrees F
- Motor: 2.4 HP
- Amps: 16A
- Watts: 1820W
- Volts: 110V
- Weight: 9 lbs
- One-year warranty
Materials: Metal and plastic
Canister Dimensions: 14″L x 7″W x
6½”H
Care: Wipe down body of dryer with a damp
cloth, clean filters free of hair and debris daily, and change
carbon brushes when indicated.
Replacement Parts: TP263 Master Equipment
Flash Dry Replacement Carbon Brush 2-Pack
Assembly Instructions for TP2402 ME™ FlashDry Control Stand
Dryer
Parts List: Four rounded screws (Part H) are
used to attach feet to the dryer, and are in place on the
underside of the dryer body. Remove feet with their screws, sit
dryer on stand bracket, and reattach feet to hold
dryer in place on stand. Parts C and D are
attached to the lower end of Bottom Pole (Part E). There is no
longer a bag of hardware shipped with the dryer. All hardware
parts are in place where they should be used.
Tools Required (Not Included)
Wrench
Phillips Screwdriver
- Assemble the base by interlocking the two base bars
(A). - Holding the two interlocked base bars together, carefully
turn base upside down. Place the large round washer plate (B)
at the intersection of the two base bars, aligning the holes.
Next, place the lock washer (C) on the twist bolt (D). Insert
the large twist bolt into the aligned holes. (Parts B, C, and
D are attached to the bottom of Part A Bottom
Pole.) - Holding the base bars together, turn the base rightside
up. Be sure the large twist bolt is visible. - Screw the bottom pole (E) onto the large twist bolt. The
end of the bottom pole with the large flat round plate is the
end that screws onto the base. - Use a wrench (not included) to tighten the large twist
bolt. - Insert the top pole (F) into the bottom pole. Secure the
two poles together at desired height by tightening the knob
on the side of the bottom pole. - Attach the dryer body (G) to the metal frame on the top
pole using the four rounded screws with rubber feet (H).
(Part H – 4 screws – are screwed into the bottom feet of the
dryer.) Use a Phillips screwdriver to tighten the
screws. - Attach the hose (I) to the dryer by pulling the plastic
neck clasp away from the hose and pressing the hose firmly
against the dryer body. Then release the plastic neck
clasp. - The concentrator nozzles (J) fit directly onto the end of
the hose. - To use the hands-free nozzle (K), remove the hose and
attach the hands-free nozzle by using the plastic neck clasp
as shown in step 8.
FlashDry Stand Dryer Operating Instructions
- • Use this dryer with 110/120-volt electrical systems. Do
not exceed the capacity of the circuit the dryer is being
used on. - • Turn the dryer on by activating the on/off power
switch. - • Select the heat setting: I (low), II (high), or neutral
(warm air) - • Turn the air speed control knob to set the desired
airflow. - • When operating the dryer, take care not to blow air
directly into pet’s eyes, ears, or other sensitive areas or
body orifices. - • Do not leave pet unattended while using this or any
dryer. - • Before shutting dryer off, turn the air speed control
knob to the lowest setting. This will extend the life of the
machine by reducing stress on the motor during startup. - • Do not insert any pins or metal objects into the
workings of the machine. This can result in electric shock or
cause the machine to short-circuit. - • Do not block or obstruct the filter or diffuser. Clean
the air intake regularly and keep it unblocked. Do not allow
water to be drawn into the air intake. - • Take care to protect the dryer housing from shock or
sudden impact.
Care Instructions
- Carbon brushes must be changed every 600 to 700 hours of
use. - Please clean the sponge filters on a regular basis by
washing them or blowing air through them. Be sure to let the
filters dry before reinstalling. - Keep the surface of the dryer clean and dry. Use a dry
and soft cloth to clean the surface. - For stubborn stains and dirt, moisten the cloth with a
mild detergent. Do not use harsh chemicals or cleaning
agents.
Safety Instructions: To reduce the risk of fire,
electric shock, or injury to person when using your appliance,
please follow these basic safety precautions.
- Read ALL instructions before using this appliance.
- Use this dryer ONLY for its intended purpose for drying
dogs and cats. - Never unplug the dryer by pulling on the power cord.
Always grasp the plug firmly and pull straight out from the
outlet. - To protect against electrical hazards, do not immerse the
dryer in water or any liquid, nor allow water to be drawn
into the air intake. - Do not operate the dryer in the presence of explosive
fumes. - Closely supervise children when the dryer is in use.
- Unplug the dryer before cleaning, before making any
repairs, or when the dryer is not in use. - This dryer should be connected to a grounded power outlet
with the proper electrical supply. Please see the operating
instructions. - Repair or replace any loose or worn parts
immediately. - Do not operate the dryer when parts are missing or
broken. - Do not use the dryer outdoors.
- Do not operate the dryer if it is damaged or
malfunctioning in any way. Contact PetEdge Customer Service
at 800-638-5754. - Avoid contact with hot surfaces.
- Do not wrap cord around motor enclosure. Continuous heat
from the motor may damage the cord insulation and cause
electric shock.
Download Instructions (PDF
File)
Download Specifications
(PDF File)
- Comes with these accessories: Stand, hands-free rigid arm, flexible hose, and two nozzles
- User-friendly buttons surround an LCD screen that displays everything from the air output setting to the heat level
- The LCD screen also includes an “hours used indicator” to help users know when to perform maintenance on the unit
- Choose heat or no-heat option with just the touch of a button
- Can be used as a canister or stand dryer (stand adjusts from 29½”–49½”)
Features a tip-resistant, 4-wheeled base for added stability in use and when moving around the shop.
Specifications:
- Air Volume: 83.56 CFM
- Air Speed: 6181.027 FPM
- Heat: 55-162 degrees F
- Motor: 1.5 HP
- Amps: 16A
- Watts: 1400W
- Volts: 110V
- Cord Length: 8’7″
- Weight: 9 lbs
- One-year warranty
Materials: Metal and plastic
Canister Dimensions: 14″L x 7″W x 6½”H
Care: Wipe down body of dryer with a damp cloth, clean filters free of hair and debris daily, and change carbon brushes when indicated.
Replacement Parts: TP263 Master Equipment Flash Dry Replacement Carbon Brush 2-Pack
Assembly Instructions for TP2402 ME™ FlashDry Control Stand Dryer
Parts List: Four rounded screws (Part H) are used to attach feet to the dryer, and are in place on the underside of the dryer body. Remove feet with their screws, sit dryer on stand bracket, and reattach feet to hold dryer in place on stand. Parts C and D are attached to the lower end of Bottom Pole (Part E). There is no longer a bag of hardware shipped with the dryer. All hardware parts are in place where they should be used.
Tools Required (Not Included)
Wrench
Phillips Screwdriver
- Assemble the base by interlocking the two base bars (A).
- Holding the two interlocked base bars together, carefully turn base upside down. Place the large round washer plate (B) at the intersection of the two base bars, aligning the holes. Next, place the lock washer (C) on the twist bolt (D). Insert the large twist bolt into the aligned holes. (Parts B, C, and D are attached to the bottom of Part A Bottom Pole.)
- Holding the base bars together, turn the base rightside up. Be sure the large twist bolt is visible.
- Screw the bottom pole (E) onto the large twist bolt. The end of the bottom pole with the large flat round plate is the end that screws onto the base.
- Use a wrench (not included) to tighten the large twist bolt.
- Insert the top pole (F) into the bottom pole. Secure the two poles together at desired height by tightening the knob on the side of the bottom pole.
- Attach the dryer body (G) to the metal frame on the top pole using the four rounded screws with rubber feet (H). (Part H – 4 screws – are screwed into the bottom feet of the dryer.) Use a Phillips screwdriver to tighten the screws.
- Attach the hose (I) to the dryer by pulling the plastic neck clasp away from the hose and pressing the hose firmly against the dryer body. Then release the plastic neck clasp.
- The concentrator nozzles (J) fit directly onto the end of the hose.
- To use the hands-free nozzle (K), remove the hose and attach the hands-free nozzle by using the plastic neck clasp as shown in step 8.
FlashDry Stand Dryer Operating Instructions
- • Use this dryer with 110/120-volt electrical systems. Do not exceed the capacity of the circuit the dryer is being used on.
- • Turn the dryer on by activating the on/off power switch.
- • Select the heat setting: I (low), II (high), or neutral (warm air)
- • Turn the air speed control knob to set the desired airflow.
- • When operating the dryer, take care not to blow air directly into pet’s eyes, ears, or other sensitive areas or body orifices.
- • Do not leave pet unattended while using this or any dryer.
- • Before shutting dryer off, turn the air speed control knob to the lowest setting. This will extend the life of the machine by reducing stress on the motor during startup.
- • Do not insert any pins or metal objects into the workings of the machine. This can result in electric shock or cause the machine to short-circuit.
- • Do not block or obstruct the filter or diffuser. Clean the air intake regularly and keep it unblocked. Do not allow water to be drawn into the air intake.
- • Take care to protect the dryer housing from shock or sudden impact.
Care Instructions
- Carbon brushes must be changed every 600 to 700 hours of use.
- Please clean the sponge filters on a regular basis by washing them or blowing air through them. Be sure to let the filters dry before reinstalling.
- Keep the surface of the dryer clean and dry. Use a dry and soft cloth to clean the surface.
- For stubborn stains and dirt, moisten the cloth with a mild detergent. Do not use harsh chemicals or cleaning agents.
Safety Instructions: To reduce the risk of fire, electric shock, or injury to person when using your appliance, please follow these basic safety precautions.
- Read ALL instructions before using this appliance.
- Use this dryer ONLY for its intended purpose for drying dogs and cats.
- Never unplug the dryer by pulling on the power cord. Always grasp the plug firmly and pull straight out from the outlet.
- To protect against electrical hazards, do not immerse the dryer in water or any liquid, nor allow water to be drawn into the air intake.
- Do not operate the dryer in the presence of explosive fumes.
- Closely supervise children when the dryer is in use.
- Unplug the dryer before cleaning, before making any repairs, or when the dryer is not in use.
- This dryer should be connected to a grounded power outlet with the proper electrical supply. Please see the operating instructions.
- Repair or replace any loose or worn parts immediately.
- Do not operate the dryer when parts are missing or broken.
- Do not use the dryer outdoors.
- Do not operate the dryer if it is damaged or malfunctioning in any way. Contact PetEdge Customer Service at 800-638-5754.
- Avoid contact with hot surfaces.
- Do not wrap cord around motor enclosure. Continuous heat from the motor may damage the cord insulation and cause electric shock.
Shipping Info: This item is not eligible for free or discounted shipping. This item qualifies for Free Shipping with the purchase of $2000 or more of select Master Equipment & ProSelect Equipment.
Download Instructions (PDF File)
Download Specifications (PDF File)
Be the first to review “Master Equipment FlashDry Control Stand Dryers”
Related products
-30%
Original price was: $24.99.$17.49Current price is: $17.49.
-30%
Original price was: $29.99.$20.99Current price is: $20.99.
-30%


Original price was: $19.99.$13.99Current price is: $13.99.
-30%

Original price was: $39.99.$27.99Current price is: $27.99.
-30%

Original price was: $12.24.$8.57Current price is: $8.57.
-30%

Original price was: $96.00.$67.20Current price is: $67.20.
-30%
Original price was: $47.99.$33.59Current price is: $33.59.
-30%

Original price was: $12.45.$8.72Current price is: $8.72.
Reviews
There are no reviews yet.